
A lab with five machines running Docker quickly becomes five terminals, five docker ps habits, and zero memory of what’s running where. Dockhand fixes that with a single UI: install it once, point it at every host, and you see every container, image, network, and volume from one screen.
This post is the setup I run on my own lab — Dockhand on my Mac, talking to a Harbor registry VM over TLS using the Hawser agent.
What We’ll Cover
- What Dockhand is and the features that earn it a spot in my lab
- Installing Dockhand locally and connecting the local Docker socket
- Adding a remote VM as a second environment via the Hawser agent
- Generating TLS certs and configuring the agent
- Turning on image scanning (Grype + Trivy), update checks and disk alerts
Environment: Dockhand on macOS, talking to a remote Debian VM running Docker. Docker socket path /var/run/docker.sock, Hawser agent listening on :2376 over HTTPS.
What is Dockhand?
Dockhand is a self-hosted web UI for managing Docker hosts. Same family as Portainer or Komodo — you run it as a container, it gives you a single pane for every host you connect to. Two ways to connect a host:
| Connection | When to use | What it needs |
|---|---|---|
| Unix socket | The host running Dockhand itself | /var/run/docker.sock mounted in |
| Hawser agent (Standard) | Remote LAN hosts with stable IPs | An agent process on the remote host, port 2376, TLS |
| Hawser agent (Edge) | Hosts behind NAT or roaming | Reverse-tunnel to Dockhand (not covered here) |
Why Dockhand
What kept me on it after the initial install is that the features you usually bolt on later are already in the box:
| Feature | What it actually does | Why it matters |
|---|---|---|
| Built-in CVE scanning | Grype and Trivy run on a schedule against every image | You see vulnerabilities surfaced per container, with severity, without standing up a separate scanning pipeline. |
| Update checks per host | Polls registries for newer tags and surfaces them in the UI | You learn Caddy 2.8 is out without auto-pulling and breaking prod — stay in control and apply updates deliberately. |
| Real-time metrics inline | CPU, Memory, Net I/O, Disk I/O on the container row itself | Health of every container on every host visible at a glance. No clicking in, no docker stats. |
| Disk-space notifications | Threshold triggers (e.g. 80%) routed via SMTP or webhook | The single most common cause of “everything stopped working” in a homelab. Get a Telegram message at 80% instead of a 100% surprise. |
| Hawser agent with TLS + token | Encrypted transport plus shared-secret authentication | A meaningfully smaller blast radius than exposing dockerd over a raw TCP socket. |
| Prune tools per host | One-click cleanup for stopped containers, dangling images, unused volumes and networks | Reclaims disk without remembering five separate docker system prune invocations. |
| Stacks (compose) editor | Deploy and edit docker-compose stacks from the UI | Works the same across local and remote environments — same workflow whether the host is on your desk or in a datacenter. |
| Layers and log viewer | Image layer breakdown and live container logs in-browser | Fast triage without SSHing into the host. |
| Multi-environment dashboard | Every connected host on a single screen | One pane covers local Docker, LAN VMs, and cloud hosts. |
Each row is something I’d otherwise wire up myself with a separate cron, exporter, or alerting bot. Having them in the same UI as the container list is what makes it worth the install.
The architecture for a typical lab looks like this:

The local environment uses the Docker socket directly. Every remote environment talks to a Hawser agent — a small daemon you run on the remote host that exposes the Docker socket over an authenticated, TLS-encrypted port.
1. Install Dockhand Locally
Follow the official quick-start at dockhand.pro. It ships as a single container.
I run it on my Mac and remap the host port so it doesn’t collide with anything else on 3000 or 8080:
docker run -d \
  --name dockhand \
  -p 3111:3000 \
  -v /var/run/docker.sock:/var/run/docker.sock \
  -v dockhand-data:/data \
  --restart unless-stopped \
dockhand/dockhand:latestDon’t leave it on the default if you already have other dashboards running. I picked 3111 so it doesn’t fight with Grafana on 3000 or anything else proxied through the firewall.
Then open http://localhost:3111 and create the admin account.
2. Add the Local Environment
Inside Dockhand, the word Environment means “a machine running Docker.” The first one is almost always the host you installed Dockhand on.
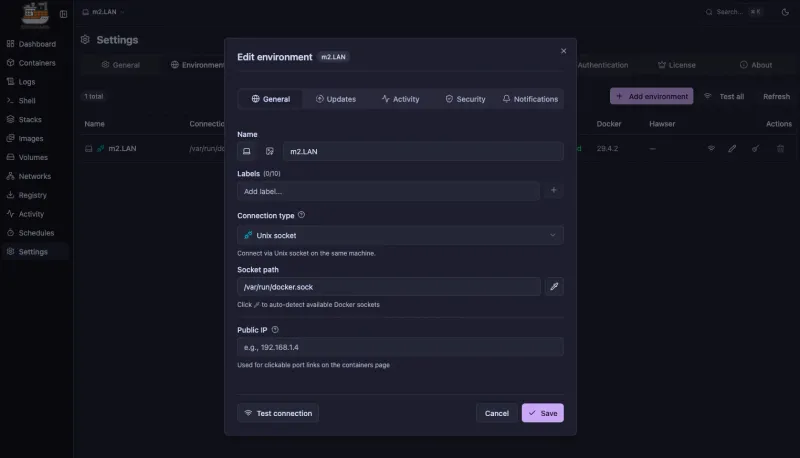
Fill in:
- Name — whatever helps you recognize it later (
local-mac,homelab-prod) - Connection type — Unix socket
- Socket path —
/var/run/docker.sock - Public IP — leave empty; Dockhand reaches Docker through the mounted socket, not the network
Save, and Dockhand pulls every container, image, network and volume into the dashboard.
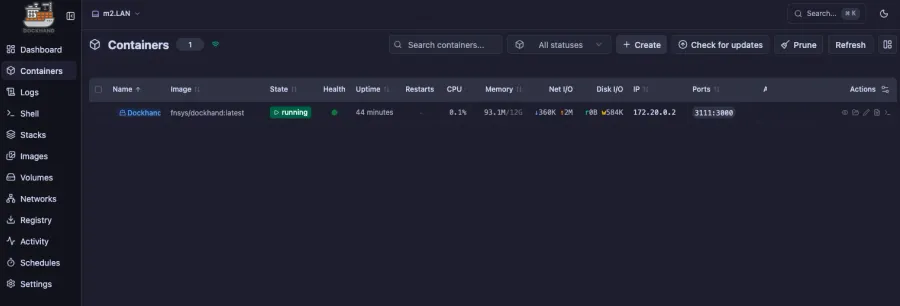
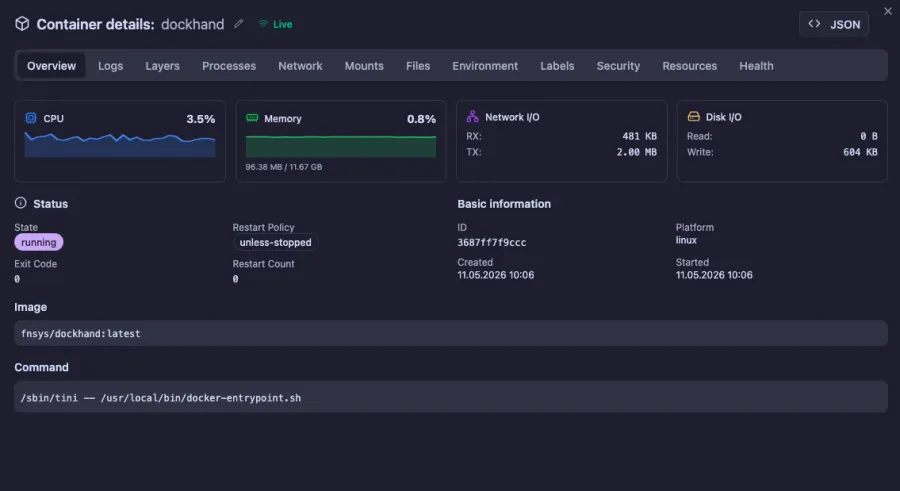
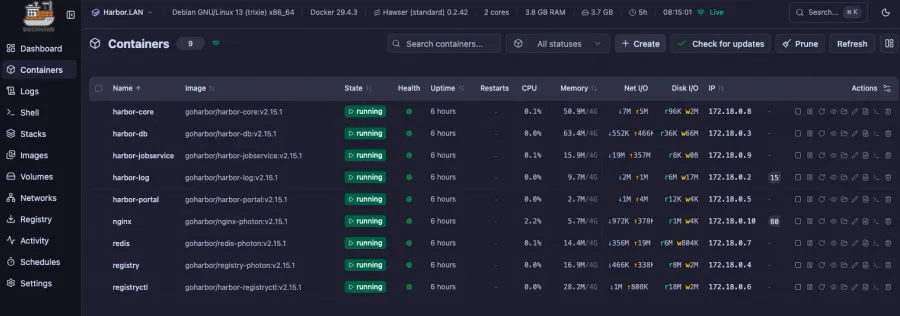
Each row gives you State, Health, Uptime, CPU, Memory, Net I/O, Disk I/O, IP and Ports without a single docker stats invocation. Click the View Detail icon to drill into a single container — Overview, Logs, Layers, Network, Mounts.
That’s the local environment done. The interesting part is the remote one.
3. Add a Remote Host Through the Hawser Agent
The Hawser agent is the missing piece. It runs on the remote machine, talks to the local Docker socket, and exposes a TLS-protected HTTP API for Dockhand to call.
The flow you’re about to wire up:
Dockhand Server  <-- HTTPS + token -->  Hawser Agent  -->  /var/run/docker.sock
   (Mac)              port 2376         (Harbor.LAN)
Four steps:
- Generate a self-signed cert/key on the agent machine
- Install and configure the Hawser agent
- Expose port
2376 - Tell Dockhand to trust that cert
3a. Generate the certificate on the agent machine
SSH into the remote host. Create the cert directory and a 4096-bit self-signed cert valid for a year:
sudo mkdir -p /etc/hawser/certs
cd /etc/hawser/certs

sudo openssl req -x509 -nodes -days 365 \
  -newkey rsa:4096 \
  -keyout key.pem \
  -out cert.pem
OpenSSL will prompt you for Country, State, Organization, Common Name and so on.
Leaving these prompts blank produces a cert with empty subject fields. Dockhand rejects it during the TLS handshake with a vague SSL error and you’ll spend an hour debugging the wrong thing. Put real values in (CN can be the hostname like harbor.lan).
You can also pre-fill everything with -subj to skip the prompts entirely:
sudo openssl req -x509 -nodes -days 365 \
  -newkey rsa:4096 \
  -keyout key.pem -out cert.pem \
  -subj "/C=VN/ST=HCM/O=Homelab/CN=harbor.lan"
3b. Install and configure the agent
Install Hawser following the docs at github.com/Finsys/hawser — usually a single binary or a small container. Then drop this config in place:
# Hawser Configuration
# See https://github.com/Finsys/hawser for documentation

# Docker socket path
DOCKER_SOCKET=/var/run/docker.sock

#################### Standard Mode (comment out for Edge mode) ####################
PORT=2376

# TLS configuration (optional, Standard mode only)
TLS_CERT=/etc/hawser/certs/cert.pem
TLS_KEY=/etc/hawser/certs/key.pem

# Token authentication (optional)
TOKEN=NSFXXwPo=
A few notes on the fields:
PORT=2376— the de facto port for “Docker API over TLS.” Open it on the host firewall but only to your Dockhand server’s IP, not to the world.TOKEN— a shared secret. Generate something random (openssl rand -base64 24) and keep it private. Dockhand sends this on every request; without it any client that trusts the cert could drive your Docker daemon.
Restart Hawser so it picks up the new config, then confirm it’s listening:
sudo systemctl restart hawser
ss -ltnp | grep 2376
3c. Add the environment in the Dockhand UI
Back on your Mac, in Dockhand, create a second environment:
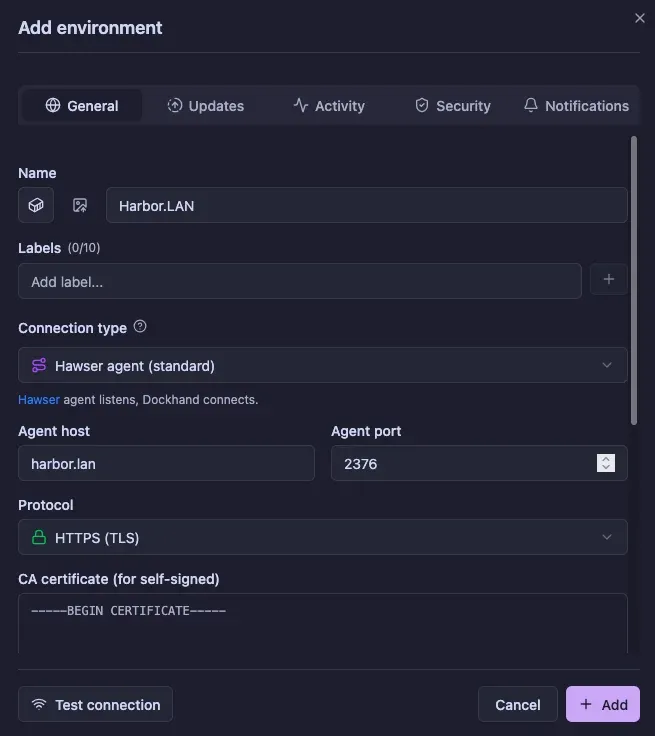
| Field | Value |
|---|---|
| Name | harbor.lan |
| Connection type | Hawser agent (Standard) |
| Agent host | static IP or local DNS name (e.g. harbor.lan) |
| Agent port | 2376 |
| Protocol | HTTPS (TLS) |
| CA Certificate | paste the contents of cert.pem from the agent machine |
| Token | the same TOKEN value from the agent config |
Save. If the cert subject is filled in and the token matches, you’ll see the new environment go green:
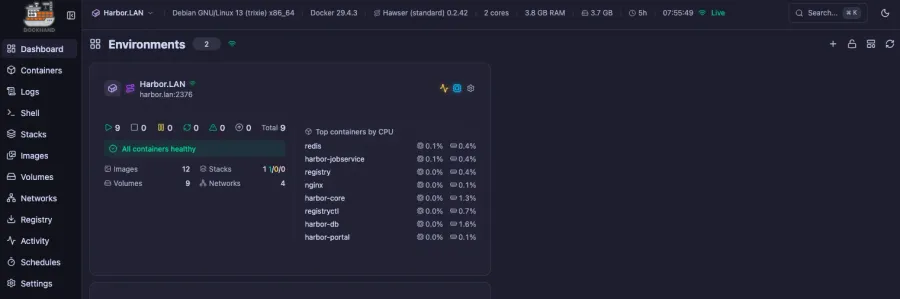
And the remote containers show up alongside the local ones, with the same live stats:
Standard mode is what you want for hosts on the same LAN with a stable IP. If your Docker host is behind NAT, on a roaming laptop, or you’d rather not poke a firewall hole, Hawser also supports Edge mode — the agent dials out to Dockhand instead of accepting inbound connections. Different config, same UI.
4. Turn on Update Checks
Dockhand can scan every running container against its registry and tell you which images have a newer tag waiting. Edit the environment, switch to the Updates tab:
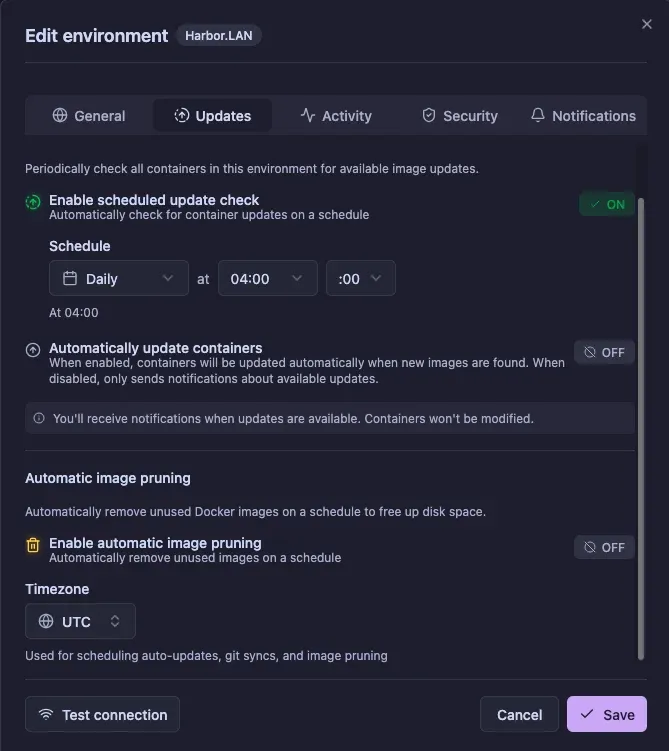
Turn it on. Do not let it auto-update containers.
An automatic pull of :latest is how you wake up to a broken Harbor at 3am because the upstream maintainer cut a breaking release. Use Dockhand to surface new versions, then review and roll forward deliberately — pin tags, read the changelog, snapshot the volume, and recreate the container yourself.
5. Image Scanning and Notifications
Dockhand ships with two vulnerability scanners: Grype and Trivy. Enable them in the environment’s Security tab and every image gets scanned for known CVEs on a schedule.
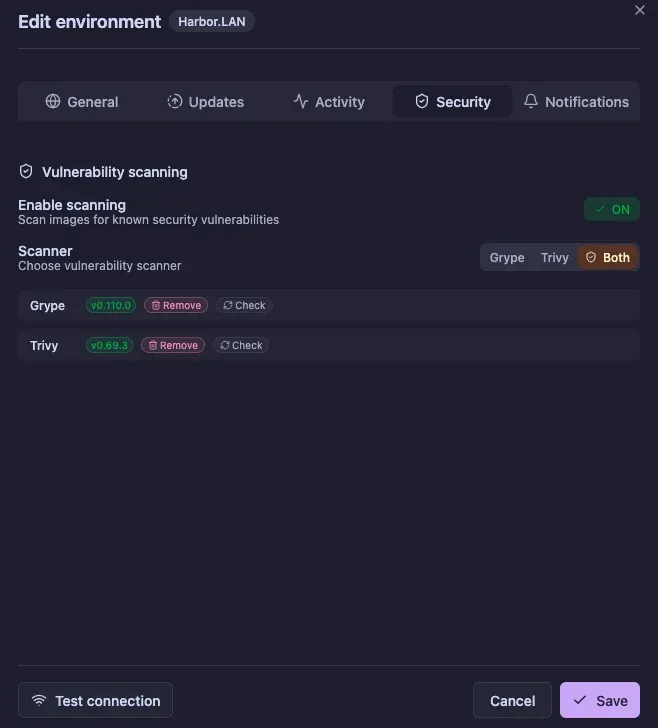
In the same panel you can wire up disk-space thresholds — say “ping me when this host hits 80%” — and route the notification through SMTP or a webhook. I send mine to a Telegram bot through a webhook, same one I use for Proxmox alerts.
What You Have Now
| Piece | Where it runs | What it does |
|---|---|---|
| Dockhand UI | Your Mac, port 3111 | Single dashboard for every host |
| Local environment | Same Mac | Manages local Docker via Unix socket |
| Hawser agent | Each remote Docker host | Exposes Docker socket over TLS + token |
| Remote environment | Configured in Dockhand UI | Pulls live container data from the agent |
| Grype + Trivy | Scheduled inside Dockhand | CVE scans per image |
| Update checks | Per environment | Surfaces newer image tags (manual apply) |
| Disk + health alerts | SMTP or webhook | Notifies before something fills up |
One UI, one set of credentials, every container in your lab visible at a glance.
Next Steps
- Add every other Docker host in your lab as its own environment — same Hawser-agent recipe.
- Lock the firewall rule for port
2376down to your Dockhand host’s IP only. - Rotate the Hawser
TOKENperiodically; treat it like an API key. - If you want hosts outside your LAN, set up a second agent in Edge mode and have it dial home.
- If you haven’t already, harden the agent machine itself first — see Linux Server Security Baseline and Fail2ban on Debian 13.